 If you’re coming to this article via Google or some other external source, you should know that we covered the use of a VPN connection in detail on our Windows 7 setup instructions. This article is a guide to help Windows XP users who need to connect to a remote Mac server for file sharing. We have to configure this through a VPN connection. We actually recommend using the built-in VPN connection on the Mac server. Assuming someone configured the VPN connection already, here are the instructions for the Windows XP setup.
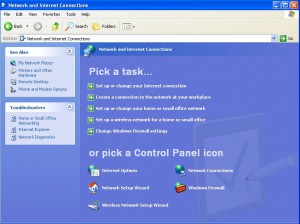
- Open the Network and Internet Connections window
- You can get there from the Start Menu by clicking Control Panel
- Click “Setup a new connection or network”
- It’s about halfway down the window under the “Change your network settings” section
- Click “Create a connection to the network at your workplace”
- Choose “Virtual Private Network connection” and click “Next”
- Enter a name for the connection in the “Company Name” field.
- It can be anything you’d like
- Type the server’s domain name or Public IP Address into the “Internet Address” field and click “Next”
- This is defined by your server administrator (If you’re one of our clients, we set this up for you), so check with them if you don’t know what to put here
- Click the checkbox to add a shortcut to your desktop and click “Finish”
- Double click the icon on your desktop
- Enter your username and password for the server
- If you’d like to save it so it signs in automatically, click the checkbox
- You can choose to save it for your user or all of the users on the computer
- Click the “Properties” button
- Click the “Networking” tab and change the “Type of VPN” drop down menu to “PPTP VPN”
- Highlight “Internet Protocol (TCP/IP)” and click the “Properties” button
- Click the “Advanced” button and uncheck the “Use default gateway on remote network” checkbox
- Click “Okay,” then “Okay” again, and “Okay” one more time
- Now that you’re back to the main connection window, click “Connect”
Congratulations, that’s it for the VPN connection. If you’re not connected, check the username and password. If that still doesn’t work, make sure you’ve typed the server’s domain name or public IP address correctly. If that still doesn’t work, you may want to check with us and see if we can figure out what’s wrong.
Now we need to setup the shortcut to the file share on the server. Follow these steps:
- Open “My Computer” from the Start Menu
- In the “Address” field, type this: Server NameFileShare
- If there’s a space in the names, enter it — if not, don’t — Windows should figure it out just fine
- If you’d prefer to use the server’s internal IP address, you can do that instead of the server name
- You should be connected to the file share now, so let’s setup the shortcut
- Click and drag the text in the “Address” field to the desktop
- You can rename the shortcut to anything you’d like
Now you’re really done! You should be talking to the Mac server from your Windows XP PC via VPN and the folder shortcut you created on your desktop. If these instructions are a bit overwhelming, give us a call and we’ll work with you to get everything connected. Leave any questions (or possible corrections) in the comments.


